
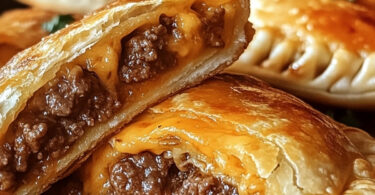
If you’re looking for a quick, crowd-pleasing appetizer that feels like it came straight from a cozy Italian restaurant, Easy Garlic Cheese Bombs are the answer. These little pillows of dough are stuffed with gooey mozzarella, brushed with a fragrant garlic-butter mixture, and baked until golden and irresistible. They’re the kind of recipe people try once — and immediately ask for again.
Whether you’re hosting a game night, feeding a hungry family, planning a holiday spread, or just craving something warm and comforting, these garlic cheese bombs deliver the perfect balance of soft bread, melty cheese, and buttery garlic flavor. They’re simple enough for beginners but delicious enough to impress even the pickiest eaters. ⭐
And the best part? You only need a handful of ingredients — most of which you probably already have on hand. This recipe uses Rhodes frozen Texas rolls, which have been a trusted favorite in home kitchens for decades. The dough bakes up light, fluffy, and perfectly chewy, making it an ideal shortcut that doesn’t sacrifice quality.
You Might Also Like:
- Loading posts...
In this full recipe article, you’ll find:
- A warm introduction to the dish
- Step-by-step instructions
- The original recipe (unchanged)
- Helpful baking tips
- Substitutions and variations
- Storage and reheating guides
- What to serve with garlic cheese bombs
- A full printable-style recipe card
Let’s dive into the cheesy goodness.
Why Everyone Loves Garlic Cheese Bombs 🧄🧀
Garlic cheese bombs have become viral for a reason. They’re essentially garlic knots stuffed with mozzarella, combining two of the most comforting foods on the planet. Every bite gives you:
- A soft, warm outer layer of golden bread
- A stretchy, melty mozzarella center
- The rich flavor of buttery garlic
- A hint of fresh parsley for color and aroma
They’re perfect as:
- A side dish for pasta
- A snack for kids (and adults)
- A party appetizer
- A cozy movie-night treat
They also bake in under 15 minutes, which means you can prep and serve them faster than takeout.
Ingredients You’ll Need 🍞🧀🧄
Here is your original recipe, unchanged but beautifully formatted and enhanced with natural emojis:
Ingredients:
- 8 frozen Texas Rolls (thawed, Rhodes brand preferred) 🍞
- 4 sticks mozzarella cheese (cut into 16 pieces) 🧀
- 4 tablespoons salted butter (melted) 🧈
- 2 cloves garlic (minced) 🧄
- 1 tablespoon parsley flakes (freshly chopped or dried) 🌿
Step-by-Step Directions (Expanded for Clarity)
Your original directions are perfect — I’ve simply expanded them for detail and readability:
1. Prepare the Dough
Thaw the frozen rolls by placing them on a plate, covering with plastic wrap, and refrigerating for at least 4 hours or overnight until doubled in size.
The dough should feel soft, airy, and easy to handle.
2. Preheat & Prep
Preheat your oven to 350°F and line a baking sheet with parchment paper.
This prevents sticking and ensures even browning.
3. Assemble the Cheese Bombs
Flatten each dough ball into a round disk using your fingers.
Place two mozzarella pieces into the center of each disk.
Pinch the edges tightly — this step is key! Any gaps may cause the cheese to leak during baking.
Place each sealed roll seam-side down on your baking sheet.
4. Bake
Bake for 9–11 minutes, or until the rolls are puffed and a warm golden brown.
They should look soft but lightly toasted on top.
5. Make the Garlic Butter
While the rolls bake, melt the butter in a microwave-safe bowl or small pan.
Stir in the minced garlic and parsley flakes to create a fragrant, buttery topping.
6. Brush & Finish
When the rolls come out of the oven, immediately brush them generously with garlic butter.
This soaks into the warm rolls beautifully, making them rich and savory.
7. Serve & Enjoy
Let them cool for a couple of minutes before biting in — the cheese will be hot and gooey.
Serve warm and enjoy the delicious molten center.
Recipe Time & Nutrition
- Prep Time: 10 minutes
- Cook Time: 10 minutes
- Total Time: 20 minutes
- Servings: 8 rolls
- Calories: 56 kcal per roll
Helpful Tips for Perfect Garlic Cheese Bombs 💡
1. Seal the Dough Very Tightly
This is the #1 trick to prevent cheese leakage.
Press the dough together firmly and smooth the seam.
2. Use Cold Cheese for Best Melt
Cold mozzarella melts slower, giving time for the dough to rise and brown properly.
3. Don’t Overbake
Remove the rolls as soon as they turn golden.
Overbaking can make the crust tough and the cheese dry.
4. Add Extra Garlic Flavor
If you want a stronger garlic punch, add:
- ½ teaspoon garlic powder
- Or roast garlic first for a richer taste
5. Brush Twice
For extra indulgence, brush once right out of the oven and again after 2 minutes.
Variations You’ll Love 🔄
1. Cheddar Cheese Bombs
Use sharp cheddar or Colby Jack for a deeper, richer flavor.
2. Pizza Bombs 🍕
Add mini pepperoni slices and serve with marinara.
3. Jalapeño Popper Bombs 🌶️
Add a small slice of jalapeño + cream cheese inside.
4. Everything Bagel Bombs
Sprinkle the tops with everything bagel seasoning before baking.
5. Ranch Garlic Bombs
Stir 1 teaspoon ranch seasoning into the garlic butter.
Serving Ideas 🍽️
Pair your garlic cheese bombs with:
- Pasta dishes like spaghetti or fettuccine alfredo
- Tomato basil soup
- Marinara or pizza sauce for dipping
- Salads like Caesar or Italian chopped salad
- A charcuterie or appetizer board
They’re also amazing as part of a holiday or game-day spread.
Storing & Reheating
Storing:
Keep leftovers in an airtight container at room temperature for 24 hours, or refrigerate for up to 3 days.
Reheating:
- Oven: 300°F for 5–6 minutes
- Air fryer: 320°F for 3 minutes
- Microwave: 10–12 seconds (softens the bread but works in a pinch)

Easy Garlic Cheese Bombs: A Cheesy Christmas Treat
Add a touch of indulgence to your holiday spread with these Savory Cheese-Stuffed Garlic Rolls. Perfect as an appetizer or a festive snack, these delightful bites ooze with gooey cheese and are brushed with fragrant garlic butter, making them an irresistible addition to your Christmas table.
Ingredients
-
- 8 frozen Texas Rolls (thawed, Rhodes brand preferred)
-
- 4 sticks mozzarella cheese (cut into 16 pieces)
-
- 4 tablespoons salted butter (melted)
-
- 2 cloves garlic (minced)
-
- 1 tablespoon parsley flakes (freshly chopped or dried)
Instructions
-
- Prepare the Dough: Thaw the frozen rolls by placing them on a plate, covering with plastic wrap, and refrigerating for at least 4 hours or overnight until doubled in size.
-
- Preheat & Prep: Preheat your oven to 350°F and line a baking sheet with parchment paper.
-
- Assemble the Bombs: Flatten each dough ball into a disk and place two mozzarella pieces in the center. Pinch the edges tightly to fully encase the cheese, and place each roll seam side down on the prepared baking sheet.
-
- Bake: Bake for 9-11 minutes or until the rolls are golden brown and puffed up.
-
- Garlic Butter Magic: While the rolls bake, melt the butter in a microwave-safe dish or on the stove. Stir in the minced garlic and parsley flakes.
-
- Final Touch: Brush the warm rolls with the garlic butter mixture as soon as they come out of the oven, letting the buttery, garlicky aroma fill your kitchen.
-
- Serve & Enjoy: Let them cool slightly before serving, revealing their cheesy, melty centers with each bite.
Notes
Prep Time: 10 minutes | Cook Time: 10 minutes | Total Time: 20 minutes
Servings: 8 rolls | Kcal: 56 kcal per roll
These Garlic Cheese Bombs are sure to become a holiday favorite, bringing a burst of savory, cheesy delight to your Christmas celebrations. Enjoy the magic of the season with every bite!

Leave a Comment