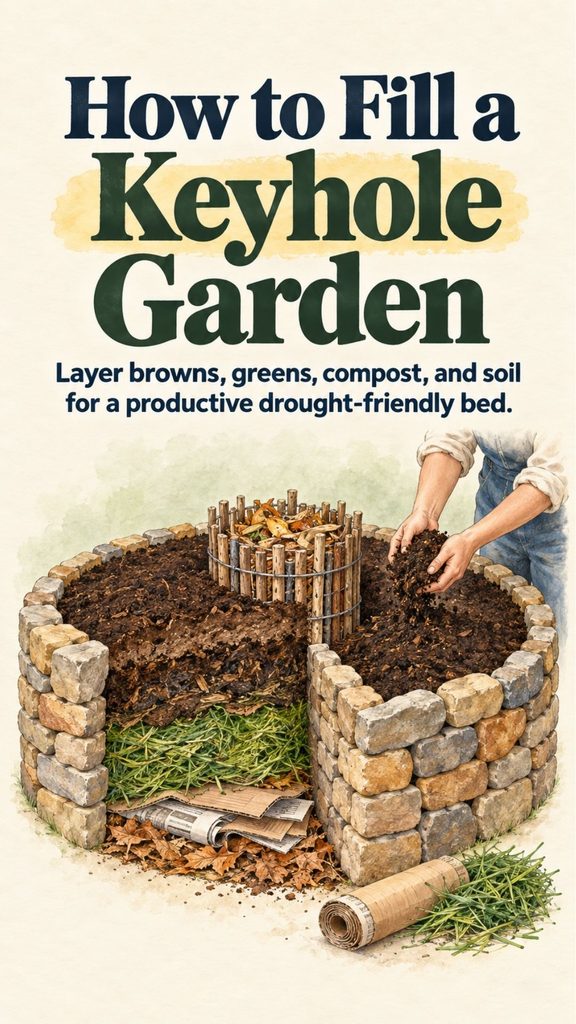
A keyhole garden is a clever way to turn a relatively small growing space into a productive raised bed, especially when your native soil is poor or difficult to work.
The basic design usually combines a circular or horseshoe-shaped raised bed with a narrow access path—the “keyhole”—that lets you reach the center without stepping into the growing area. Many traditional keyhole designs also include a compost basket in the middle so kitchen scraps and organic matter can gradually contribute nutrients to the surrounding bed.
Once the walls are built, the next job is filling the garden.
You Might Also Like:
- Loading posts...
This is where a keyhole bed differs from simply dumping several bags of potting soil into a raised bed. The lower portion can be built from bulky organic material that gradually decomposes, while the upper planting layer should contain enough finished compost and good-quality soil for plants to establish immediately.
The goal is to create a deep, moisture-retentive bed without turning it into a soggy pile of undecomposed waste.
Start With the Right Materials
Before filling the garden, gather as much material as possible so you can build the bed in one session or over a short period.
Useful materials can include:
- Plain corrugated cardboard
- Shredded or torn plain paper
- Dry leaves
- Small untreated woody material
- Grass clippings in thin layers
- Garden trimmings
- Finished compost
- Well-aged manure
- Good garden soil or raised-bed soil
- Water for moistening each layer
Think of the materials in two broad groups.
Brown materials are carbon-rich ingredients such as dry leaves, cardboard, paper, straw, and small dry twigs.
Green materials are nitrogen-rich ingredients such as fresh grass clippings, soft green plant material, vegetable scraps, coffee grounds, and some manures.
A mixture of both decomposes more effectively than a bed made almost entirely from one type.
Avoid Problem Materials
Not everything biodegradable belongs in a keyhole garden.
Avoid glossy or heavily coated paper, plastic-coated cardboard, synthetic fabric, treated or painted wood, diseased plant material, and plants that have been sprayed with persistent herbicides.
Old clothing is sometimes suggested as filler, but it is better to leave it out unless you know it is made entirely from untreated natural fibers. Many modern fabrics contain polyester, nylon, elastic, dyes, coatings, or blended synthetic fibers that you do not want breaking down in garden soil.
Also be cautious with animal manure.
Fresh manure can contain excessive salts or nitrogen and may damage plant roots. Manure from horses, cows, sheep, goats, or poultry is generally better composted or well aged before it is placed near the root zone.
Manure from dogs, cats, or humans should not be added to a vegetable garden.
Line the Inside if Necessary
If the garden walls have large gaps, a temporary cardboard lining can help keep loose material from spilling through while the bed settles.
Use plain corrugated cardboard with tape, labels, and plastic film removed.
Wet the cardboard lightly so it becomes flexible, then shape it against the inside wall.
You do not need to create an impenetrable cardboard shell.
The purpose is simply to contain the filling material while allowing moisture and biological activity to move through the bed.
If your walls are already solid stone, brick, block, or another tightly fitted material, lining may not be necessary.
Build the Bottom With Coarse Organic Material
The lowest section of a deep keyhole bed can contain bulky organic matter.
Start with materials such as small branches, dry stalks, coarse leaves, or loosely crumpled cardboard.
These materials occupy space and decompose gradually.
Do not pack thick slabs of cardboard tightly across the entire bottom like waterproof flooring. Dense, saturated layers can interfere with drainage and airflow.
Tear or overlap cardboard loosely and combine it with other organic material.
If you use woody material, keep it to moderate-sized branches and pieces rather than enormous logs unless the bed is exceptionally deep.
The lower layer should have structure without becoming a solid barrier.
Moisten as You Build
One of the most useful habits when filling a keyhole garden is watering each layer as it goes in.
Dry cardboard and leaves can repel water at first.
If the entire bed is filled dry and watered only at the end, water may run around dry pockets instead of soaking evenly through the material.
Moisten the layers until they feel like a wrung-out sponge.
You want damp organic material, not a waterlogged bed.
This initial moisture helps decomposition begin and makes lightweight materials settle into place.
Add a Layer of Dry Leaves
Dry leaves are excellent raised-bed filler.
They provide carbon, hold moisture, and gradually break down into organic matter.
Add a generous layer and spread it evenly.
If the leaves are extremely dry, water them as you work.
Shredded leaves break down more quickly, but whole leaves can also be used if they are mixed with other materials rather than compressed into a thick, matted layer.
If you collect neighborhood leaves, know where they came from.
Avoid bags that may contain trash, pet waste, diseased plant material, or grass treated recently with herbicides you cannot identify.
Free organic material is useful only when it is suitable for the garden.
Add Green Material in Thinner Layers
Next, add some nitrogen-rich material.
Fresh grass clippings can work well, but do not add a thick, compacted layer.
A heavy mass of wet grass can turn slimy, heat excessively, and become anaerobic.
Instead, spread grass clippings in a relatively thin layer and mix them with dry leaves or other carbon-rich materials.
Soft garden trimmings can also be used.
Chop large pieces where practical so they break down more easily.
Avoid weeds loaded with mature seeds, especially if the composting process will not become hot enough to destroy them.
Also avoid invasive plants that readily root from stems or rhizomes.
Use Coffee Grounds as One Ingredient, Not the Main Ingredient
Coffee grounds can be added to a keyhole garden, but they should be treated as one component of the organic mix.
Do not build an entire layer several inches thick from coffee grounds.
Mix modest quantities with leaves, compost, shredded cardboard, or other organic material.
Despite their dark color, used coffee grounds are generally considered a nitrogen-rich compost ingredient rather than a substitute for finished compost or soil.
They are useful, but more is not automatically better.
Repeat Browns and Greens
Continue building the lower portion of the bed by alternating and mixing carbon-rich and nitrogen-rich ingredients.
There is no need to measure mathematically perfect layers.
The important thing is diversity.
For example, you might use:
a layer of leaves,
some damp torn cardboard,
a thinner layer of grass or green trimmings,
a layer of partially finished compost,
then more leaves.
Mixing materials slightly where the layers meet can help prevent dense boundaries from developing.
As you fill, water dry materials and press them down gently.
Do not stomp the bed into a hard, airless mass.
Organic material needs some pore space for water and oxygen.
Don’t Fill the Whole Bed With Raw Organic Matter
A common mistake with deep raised beds is filling nearly everything with leaves, cardboard, and green waste, then covering the top with only a few inches of soil.
That can create problems.
Young vegetable roots need a stable planting zone containing actual soil and mature organic matter.
Freshly decomposing material can settle dramatically and may temporarily alter nutrient availability as microbes break it down.
For that reason, leave a substantial upper portion of the garden for finished growing medium.
The exact depth depends on what you plan to grow, but vegetables generally benefit from a generous root zone rather than a thin decorative layer of soil.
Add Finished Compost
Finished compost is different from the raw material deeper in the bed.
It should be dark, crumbly, and mostly decomposed, without large amounts of recognizable fresh material.
Spread finished compost over the partially filled garden.
This provides organic matter closer to the root zone without requiring young plants to grow directly into a pile of fresh decomposition.
Homemade compost works well when mature.
Purchased compost can also be used.
Quality varies considerably, so avoid assuming that every bag labeled “compost” is identical.
Use Well-Aged Manure Carefully
Properly composted manure can contribute organic matter and nutrients.
Mix it with the soil and compost rather than creating a thick pure manure planting layer.
Different manures vary greatly in nutrient concentration and salt content.
Poultry manure, for example, can be particularly concentrated and should generally be fully composted before garden use.
There is another issue worth knowing about: manure and compost can occasionally contain residues from persistent pasture herbicides.
These herbicides may pass through an animal and remain active in manure, damaging sensitive garden crops such as tomatoes, beans, peas, and potatoes.
If the history of a manure source is uncertain, ask about herbicide use or test a small amount before spreading it throughout an important vegetable bed.
Finish With Good Growing Soil
The top portion should contain a balanced growing medium.
A practical mixture can include good-quality topsoil or garden soil combined with mature compost.
The final surface should feel loose enough for roots to penetrate but substantial enough to retain moisture and anchor plants.
Avoid filling the top entirely with commercial potting mix unless that is appropriate for your particular bed and climate. Potting mixes can shrink considerably and may dry differently from mineral soil.
Likewise, avoid using heavy native clay by itself if your original reason for building a raised garden was poor drainage or difficult soil.
Aim for a mixture that has both mineral soil and organic matter.
Fill the Bed Slightly Higher Than the Final Level
A freshly constructed keyhole garden will settle.
Leaves collapse.
Cardboard softens.
Woody material decomposes.
Compost continues breaking down.
Air spaces disappear.
Because of this, you can mound the final soil surface slightly above the level you ultimately want.
Do not create an extreme mound that will wash off during heavy rain.
A gentle crown is enough.
Over the first growing season, expect to add more compost or soil as the contents settle.
That is normal.
A keyhole garden is a living system rather than a structure that remains exactly the same height forever.
What About the Center Compost Basket?
If your keyhole garden includes the traditional center compost basket, keep it open while filling the surrounding bed.
The basket can be made from wire mesh or another durable material that allows moisture and decomposition products to move outward while keeping fresh scraps contained.
Add appropriate compostable kitchen material gradually rather than stuffing the basket completely full in one day.
Useful additions include fruit and vegetable scraps, coffee grounds, tea leaves without plastic-containing bags, and small amounts of other suitable compostable material.
Balance wet food scraps with dry carbon materials such as shredded cardboard or dry leaves.
Avoid meat, large quantities of fat, dairy products, pet waste, and anything likely to attract pests unless you are using a composting system specifically designed to handle them.
The central basket is one of the features that distinguishes many keyhole gardens from ordinary raised beds.
Water the Completed Bed Thoroughly
Once the soil layer is in place, water the garden deeply.
This helps settle loose pockets and shows whether the soil level drops significantly.
If major depressions form, add more soil and finished compost before planting.
Water should soak into the bed rather than immediately running off the surface or pooling for long periods.
One of the advantages often associated with deep organic raised beds is good moisture retention, but no garden is truly drought-proof.
Newly planted vegetables still require regular monitoring and irrigation.
Give a Freshly Filled Bed Time to Settle if Possible
You can plant a keyhole garden soon after filling it if the upper root zone contains mature compost and good soil.
However, allowing the bed to sit for a short period can make management easier.
After several waterings, the contents will begin settling and you can see where additional soil is needed.
If the lower layers contain a large amount of fresh green material or manure, giving the system more time is particularly useful.
The more unfinished organic material you add, the more biological activity and settling you should expect.
Choose Plants That Fit the Space
Keyhole beds are compact, so thoughtful planting matters.
Place taller plants where they will not unnecessarily shade shorter crops.
Allow spreading plants enough room.
Use trellises where appropriate for climbing crops.
Herbs, leafy greens, peppers, bush beans, compact tomatoes, and many other vegetables can work well depending on climate and bed size.
Do not assume that extremely close planting is always beneficial.
Crowded foliage can reduce airflow and increase competition for water and nutrients.
Use the normal spacing needs of the crops as your starting point, then adjust based on experience with your particular garden.
Mulch the Surface
Once plants are established, adding organic mulch can make the garden easier to maintain.
Straw, shredded leaves, or another suitable mulch can help:
reduce evaporation,
moderate soil temperature,
limit weed growth,
and protect the soil surface from heavy rain.
Keep mulch slightly away from the bases of young stems rather than packing wet material directly against them.
In hot, dry climates, mulch can be especially useful for conserving soil moisture.
Expect the Garden to Change Over Time
A newly filled keyhole garden will look very different after a few months.
The lower organic layers will begin decomposing.
The soil surface will drop.
Earthworms and other soil organisms may move through the bed.
Plants will remove nutrients.
Mulch will break down.
This is all part of the process.
At the end of a growing season—or whenever the level noticeably falls—top the garden up with finished compost and additional soil if needed.
Do not keep adding thick amounts of raw material directly around established plant roots.
Save most fresh material for the compost basket or for rebuilding deeper layers when the bed is eventually renovated.
A Better Way to Think About the Layer Ratios
You may see instructions recommending that a keyhole garden be filled with one-third brown material, one-third green material, and one-third soil or manure.
That can be a useful visual starting point, but it should not be treated as an exact formula.
A thick layer of fresh grass behaves differently from a layer of dry leaves.
Fresh manure behaves differently from finished compost.
Logs behave differently from shredded cardboard.
The condition of the materials matters as much as the amount.
A safer practical approach is:
Use coarse and carbon-rich material deeper in the bed.
Add moderate amounts of green material mixed throughout.
Reserve a substantial upper layer for mature compost and good growing soil.
That gives plants a dependable root zone while the lower materials decompose gradually.
Don’t Expect the Bed to Eliminate Watering
Keyhole gardens are often promoted for dry climates because deep organic matter, mulch, thoughtful irrigation, and a central compost basket can help retain moisture efficiently.
That does not mean the garden produces water or never needs irrigation.
During hot weather, newly planted vegetables may still need frequent watering.
Wind, soil composition, plant size, rainfall, and temperature all affect how quickly the bed dries.
Check the soil itself rather than relying on a fixed watering schedule.
Push a finger several inches into the soil.
If the root zone is still moist, wait.
If it is drying significantly, water deeply.
Consistent deep watering is generally more useful than repeatedly wetting only the surface.
Filling a Keyhole Garden Is Really About Building Soil
The most important thing to understand is that you are not simply filling an empty structure.
You are building a soil system.
The lower layers provide bulk and long-term organic matter.
Brown and green ingredients decompose together.
Finished compost provides stable organic material.
Soil gives plant roots structure and minerals.
Mulch protects the surface.
And over time, the entire bed changes as decomposition continues.
That is why the best keyhole gardens are not filled once and forgotten.
They are maintained.
Compost is added.
Mulch is renewed.
Settled soil is topped up.
Plants are rotated.
The center compost basket, if present, is managed throughout the season.
With sensible materials and a good planting layer, an empty keyhole bed can become a productive growing space without requiring you to purchase enough bagged soil to fill every inch from the ground up.
And perhaps that is the most useful part of the method: leaves, cardboard, compost, garden trimmings, and other materials that might otherwise be discarded can become part of the foundation for growing food—provided they are used thoughtfully rather than simply thrown into the bed.