
The Creamiest, Dreamiest Peanut Butter–Chocolate Treat You’ll Ever Make
If you’re a fan of the classic Reese’s Peanut Butter Eggs that appear every Easter season, get ready — because this homemade version may easily become your new favorite candy. Soft, creamy, melt-in-your-mouth peanut butter centers wrapped in a silky, sweet chocolate shell… it’s everything people love about Reese’s Eggs, but even better.
Why better? Because homemade means:
✔️ Fresher ingredients
✔️ Thicker peanut butter centers
✔️ Smoother chocolate coating
✔️ No waxy texture
✔️ Truly addictive flavor
These homemade Reese’s Eggs are perfect for gifting, Easter baskets, baby showers, parties, or just keeping in the freezer for those “I need chocolate NOW” moments. They’re incredibly easy to make, requiring no baking and only a handful of simple, pantry-friendly ingredients. With a little mixing, shaping, dipping, and chilling, you end up with a batch of irresistible peanut butter eggs that taste like they came straight from a candy shop.
You Might Also Like:
- Loading posts...
Let’s dive deeper into why this recipe works so well and how to make each step smooth and successful.
🥜 Why Homemade Reese’s Eggs Taste So Good
This recipe nails the perfect ratio of peanut butter to chocolate. The filling is soft but moldable, with the right balance of salty, sweet, creamy, and rich. Unlike commercial versions, homemade peanut butter eggs tend to be:
- Creamier in texture
- Richer in peanut flavor
- Less sugary (believe it or not!)
- More generous in size
- Made with real chocolate instead of waxy candy coating
Each bite gives you a thick peanut butter center surrounded by a firm chocolate shell that snaps ever so slightly before melting on your tongue.
🧈 Ingredient Breakdown: How Each Ingredient Works
For the Peanut Butter Filling
1 cup creamy peanut butter
Classic, smooth peanut butter works best. Avoid natural peanut butters that separate, as the oil content makes the filling too soft.
1/4 cup unsalted butter, softened
Softened butter binds the filling and gives it that melt-in-your-mouth creaminess that Reese’s is known for.
1 teaspoon vanilla extract
Adds warmth and enhances sweetness.
2 cups powdered sugar
Powdered sugar thickens the peanut butter mixture into a moldable dough. It also gives the filling that classic confection-style texture.
For the Chocolate Coating
2 cups milk chocolate chips
Milk chocolate gives the classic flavor, but semisweet or dark chocolate can also be used for a richer profile.
1 tablespoon vegetable shortening
Shortening thins the chocolate for easier dipping, prevents thick clumps, and creates a smoother, shinier coating.
🍫 Step-by-Step Expanded Instructions
Your directions are spot-on — here’s an expanded, detailed version explaining why each step matters.
⭐ 1. Prepare the Peanut Butter Filling
Mix peanut butter, softened butter, and vanilla until smooth. Softened butter blends much easier and prevents lumps.
Gradually add powdered sugar. Adding it slowly prevents dryness and helps you achieve that perfect dough-like consistency. The mixture should be:
- soft
- firm enough to shape
- not sticky
- smooth and pliable
If it’s too sticky → add a tablespoon or two of powdered sugar.
If it’s too stiff → add a teaspoon of melted butter.
⭐ 2. Shape the Peanut Butter Eggs
Line a baking sheet with parchment paper — this prevents sticking and makes cleanup simple.
Scoop out portions (tablespoon to 2 tablespoons depending on desired size) and shape them with your hands into smooth, oval “egg” shapes.
Tip: Lightly greasing your hands with butter or oil helps reduce sticking.
Place them on the baking sheet and prepare to freeze.
⭐ 3. Freeze the Peanut Butter Eggs
Freeze for at least 30 minutes.
This step is crucial:
- It firms the peanut butter center
- Makes dipping MUCH easier
- Prevents the eggs from falling apart
- Helps the chocolate harden quickly and evenly
The colder they are, the smoother the coating will be.
⭐ 4. Prepare the Chocolate Coating
Add chocolate chips and shortening to a microwave-safe bowl.
Heat in 30-second increments, stirring each time — this prevents scorching and ensures a smooth chocolate consistency.
The shortening melts into the chocolate and gives it:
- silkiness
- fluidity
- better setting texture
- a beautiful shine
Once the chocolate is fully melted and glossy, it’s ready for dipping.
⭐ 5. Dip the Peanut Butter Eggs
Using a fork is perfect — it allows excess chocolate to drip away and keeps the coating from becoming too thick.
Dip each frozen peanut butter egg into the melted chocolate and lift it carefully. Allow extra chocolate to drip off before placing it back on the parchment.
Tip: Tap the fork gently against the edge of the bowl to remove excess chocolate for a smoother finish.
Repeat for all eggs.
⭐ 6. Freeze Again to Set
Place the coated eggs back in the freezer for 15–20 minutes.
This helps the chocolate:
- fully harden
- bond to the peanut butter
- develop a firm yet melt-in-your-mouth texture
⭐ 7. Serve & Store
Once set, the Reese’s Eggs are ready to enjoy!
They can be eaten straight from the fridge for a firmer bite or allowed to soften slightly at room temperature for a creamier center.
Storage:
Store them in an airtight container in the refrigerator for the freshest texture. They keep well for 2–3 weeks, and even longer if frozen.
✨ Optional Finishing Touches
To make them even prettier:
- Drizzle melted chocolate on top for a decorative stripe
- Sprinkle crushed peanuts over the wet chocolate
- Add a pinch of sea salt on top (delicious!)
- Dip half the egg in dark chocolate and half in milk chocolate
- Add pastel sprinkles for Easter
These simple touches take the eggs from homemade to boutique-style.
🎉 When to Serve Homemade Reese’s Eggs
This recipe is perfect for:
- Easter baskets 🐣
- Spring celebrations 🌷
- Baby showers
- Kids’ parties
- Homemade gift boxes
- Holiday dessert platters
- Freezer treats anytime
These candy eggs become a favorite tradition once you make them — they’re surprisingly easy yet deeply impressive.
🌟 Why Everyone Loves This Recipe
- Sweet, creamy peanut butter filling
- Smooth, melt-in-your-mouth chocolate shell
- Fun and easy to make
- Only a handful of ingredients
- No baking required
- Better than store-bought
- Can be customized with toppings or different chocolate types
They’re nostalgic, indulgent, and absolutely irresistible.
Print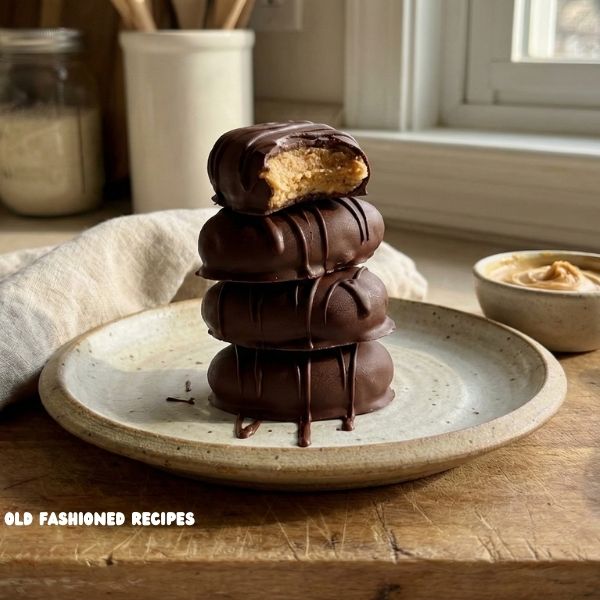
Homemade Reese’s Eggs
Who doesn’t love that irresistible combination of peanut butter and chocolate? If you’ve ever found yourself sneaking a Reese’s Egg (or three!) during the holiday season, this recipe is going to be your new best friend. Making these homemade Reese’s Eggs is surprisingly easy, and they taste even better than the store-bought version – not to mention, you know exactly what’s going into them!
Ingredients
For the Peanut Butter Filling:
-
- 1 cup creamy peanut butter
-
- 1/4 cup unsalted butter, softened
-
- 1 teaspoon vanilla extract
-
- 2 cups powdered sugar
For the Chocolate Coating:
-
- 2 cups milk chocolate chips
-
- 1 tablespoon vegetable shortening
Instructions
-
- Prepare the Peanut Butter Filling:
-
- In a mixing bowl, combine the creamy peanut butter, softened butter, and vanilla extract.
-
- Gradually add the powdered sugar, mixing until well combined. The mixture should be firm but still easy to mold.
-
- Shape the Peanut Butter Eggs:
-
- Line a baking sheet with parchment paper.
-
- Scoop out portions of the peanut butter mixture and shape them into egg-like forms. Place them on the prepared baking sheet.
-
- Transfer the baking sheet to the freezer and let the peanut butter eggs chill for at least 30 minutes.
-
- Prepare the Chocolate Coating:
-
- In a microwave-safe bowl, melt the milk chocolate chips and vegetable shortening together in 30-second intervals, stirring between each interval until smooth.
-
- Coat the Peanut Butter Eggs:
-
- Using a fork, dip each frozen peanut butter egg into the melted chocolate, ensuring it’s fully coated.
-
- Allow any excess chocolate to drip off before placing the coated eggs back on the parchment-lined baking sheet.
-
- Chill and Set:
-
- Return the baking sheet to the freezer to let the chocolate coating set. This will take approximately 15-20 minutes.
-
- Serve and Enjoy:
-
- Once the chocolate is fully set, your homemade Reese’s Eggs are ready to be enjoyed.
-
- Store any leftovers in an airtight container in the refrigerator.
Notes
-
- For an extra touch, drizzle melted white chocolate over the dark chocolate coating.
-
- Try different nut butters for unique flavor variations.
Enjoy every bite!


Leave a Comment