
Good morning, breakfast enthusiasts! ☀️👋
Let’s be honest with each other for a moment. We all love the idea of a freshly baked, laminated dough pastry from a high-end French patisserie. You know the kind—hundreds of layers of butter and flour, folded with mathematical precision, rising to flaky perfection over the course of three days. It’s romantic. It’s artisan. It’s… exhausting. 😴
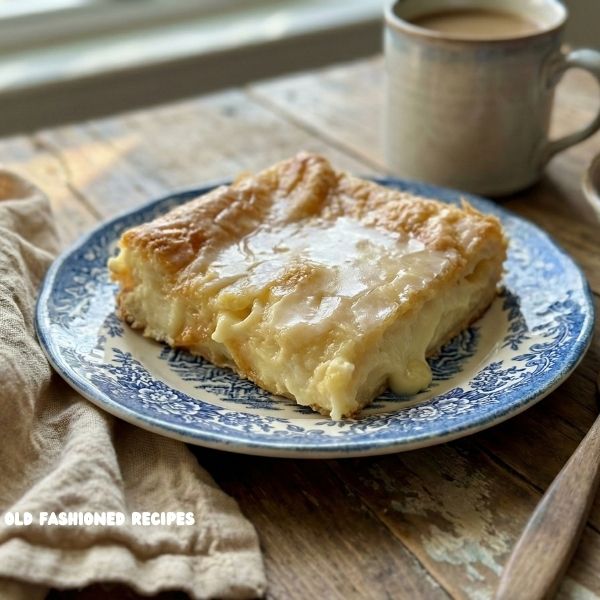
Sometimes (okay, most of the time), you want that luxurious, creamy, flaky experience without needing a degree in pastry arts or waking up at 3:00 AM to laminate dough. Enter the Easy Breakfast Cheese Danish. 🏆
You Might Also Like:
- Loading posts...
If you haven’t tried this recipe yet, you are in for a life-changing revelation. And if you have tried it, you are probably already nodding your head, remembering the first time you bit into that warm, vanilla-scented square of heaven. This recipe is legendary in the home-cooking community for a reason: it delivers 100% of the flavor with about 10% of the effort. It is the culinary equivalent of winning the lottery without buying a ticket. 🎫💰
Today, we are going to explore why this specific recipe has stood the test of time, how to master it (it’s easy, but there are tricks!), and why it deserves a permanent spot in your recipe binder. Let’s preheat those ovens! 🔥
🧈 The Magic of the “Semi-Homemade” Miracle
There is a special place in the culinary world for recipes that utilize store-bought “hacks” to create something that tastes entirely homemade. This Cheese Danish relies on the humble refrigerated crescent roll. 🌙
Now, food snobs might turn up their noses, but let me tell you: when unrolled and baked flat, that dough transforms. It mimics the puff pastry texture—buttery, slightly salty, and incredibly flaky—while providing a sturdy enough base to hold up a heavy, luscious cheesecake layer.
Why It Works So Well
The genius of this recipe lies in the Sweet vs. Savory balance.
- The Dough: Crescent roll dough has a slight savory, buttery tang. 🧂
- The Filling: The cream cheese mixture is dense, sweet, and rich. 🍬
- The Glaze: The powdered sugar drizzle adds that sharp, sugary spike that hits your tongue first. 👅
When you combine these three elements, your brain lights up. It’s the same reason we love salted caramel or pancakes with bacon. It’s comfort food science at its finest. 🧪✨
🛒 The Cast of Characters: Ingredient Deep Dive
Since this recipe is so simple, the way you handle your ingredients matters. Let’s break down what you need and why.
1. The Crescent Rolls (The Foundation) 🏗️
You need two cans. One for the floor, and one for the roof. While name-brand rolls often puff up the best, store brands work perfectly fine here too!
- Pro Tip: Keep the cans in the fridge until the very last second. Cold dough is easier to unroll and pinch. If it gets warm, it gets sticky and frustrating. ❄️
2. Cream Cheese (The Heart) 🤍
This is the star of the show. You need two 8-ounce blocks.
- Critical Step: Your cream cheese MUST be at room temperature. I cannot stress this enough! 🛑 If you try to beat cold cream cheese, you will end up with lumpy filling. You want a silky, smooth, cheesecake-like consistency. Leave the blocks on the counter for at least an hour before you start.
3. The Extracts (The Aroma) 🌸
Vanilla extract is non-negotiable. It bridges the gap between the tangy cheese and the sugar.
- Elevation Idea: If you want to feel fancy, try using vanilla bean paste instead of extract. Those little black specks look beautiful in the white filling.
4. The Eggs (The Structure) 🥚
The recipe calls for an egg inside the filling and an egg white on top.
- Inside: The whole egg in the filling acts as a binder. It helps the cheesecake layer “set” so it doesn’t ooze out when you cut it.
- Outside: The egg white wash on the top crust is what gives it that glossy, professional bakery sheen. Without it, the top might look a bit dull.
🥣 Master Class: Tips for the Perfect Bake
You might think, “It’s just unrolling dough, how hard can it be?” But there is a difference between a good Danish and a great Danish. Follow these steps for greatness. 🌟
The “Pinch” Technique 🤏
When you lay down that bottom layer of crescent rolls, you will see perforated triangles. You need to seal these seams.
- Don’t just poke them. Use your thumb and forefinger to actually pinch the dough together, then smooth it flat. If you leave gaps, the sugary filling will leak through to the bottom of the pan, caramelize, and possibly burn/stick. We want the filling to stay inside the pastry sandwich!
The Spread 🔪
Spreading thick cream cheese over a delicate layer of raw dough can be tricky.
- Technique: Dollop the filling in big spoonfuls all over the dough first (like pepperoni on a pizza). Then connect the dots by gently spreading. If you dump it all in the middle and try to push it out, you might tear the bottom dough layer.
The Top Layer Struggle 🤯
Getting the second sheet of raw dough on top of the slippery cheese filling is the hardest part of this recipe.
- The Hack: Unroll the second can of dough on a piece of parchment paper on the counter. Pinch the seams together there. Then, pick up the parchment paper, flip the dough sheet onto the pan, and peel the paper off. Voila! Perfect top layer with zero stress. 🧘♀️
The Bake Watch 👀
Every oven is different. The recipe suggests 35-45 minutes, but the sugar content in the dough means it can go from “golden” to “burnt” quickly.
- The Jiggle Test: At the 30-minute mark, open the oven and gently shake the pan. The center should be set, not liquid. The top should be a deep, puffy golden brown. If the top is browning too fast but the center is still jiggly, cover it loosely with foil for the last 10 minutes.
🎨 Customization Station: Make It Your Own!
Once you master the base recipe (which is flawless as is), you can start getting creative. Here are a few variations that people go crazy for:
- The “Churro” Style: Before baking, instead of just the egg white wash, sprinkle the top heavily with cinnamon sugar. 🍂
- Berry Bliss: Scatter a handful of fresh raspberries or blueberries over the cream cheese layer before adding the top crust. The fruit bursts during baking creating little pockets of jam. 🫐
- Lemon Lovers: Add the zest of one lemon to the cream cheese mixture and a squeeze of lemon juice to the glaze. It tastes like sunshine! 🍋
- Fall Edition: Mix a ½ cup of pumpkin puree and pumpkin spice into the cheese mixture. 🎃
🕰️ When to Serve This Masterpiece
This dish is incredibly versatile. It’s robust enough to hold up on a buffet table but elegant enough for a sit-down meal.
- Christmas Morning: 🎄 You can prep the pan the night before (keep it in the fridge), and just pop it in the oven while you open presents.
- Office Potlucks: 💼 Cut them into small squares. Warning: You will become the most popular person in the office.
- Lazy Sundays: 🛌 It pairs perfectly with a hot cup of coffee and a crossword puzzle.
🛑 Troubleshooting Common Issues
- “My bottom is soggy!” -> You might have underbaked it, or your oven runs cool. Try baking on a lower rack next time to ensure the bottom heat penetrates the pan. Also, make sure you didn’t grease the pan too heavily.
- “The filling is runny!” -> Did you slice it while it was hot? 🚫 You must let this cool! The cream cheese needs to drop in temperature to firm up again. 20 minutes is the minimum, but fully cooled is even better.
- “The top is burnt!” -> Crescent roll dough has sugar in it. Keep an eye on it after 30 minutes. Tent with foil if needed.
Easy Breakfast Cheese Danish
Here it is! The holy grail of easy breakfasts. I have kept the recipe exactly as you know and love it, with just a few helpful descriptors to ensure your success.
Ingredients
The Danish:
-
Crescent Rolls: 2 cans (8 oz each) refrigerated crescent roll dough 🌙
-
Cream Cheese: 2 packages (8 oz each), softened to room temperature 🧀
-
Sugar: 1 cup white granulated sugar 🍬
-
Vanilla Extract: 1 teaspoon 🌼
-
Egg: 1 large egg (for the filling) 🥚
-
Egg White: 1 egg white (beaten, for brushing the top) 🖌️
The Glaze:
-
Powdered Sugar: ½ cup (confectioners’ sugar) 🌨️
-
Milk: 2 tablespoons (plus more if needed for consistency) 🥛
-
Vanilla Extract: ½ teaspoon 🌼
Instructions
-
Preheat & Prep: Preheat your oven to 350°F (175°C). Generously grease a 13×9-inch baking pan with butter or non-stick cooking spray.
-
The Foundation: Pop open the first can of crescent rolls. Unroll the dough into the bottom of the prepared pan.
-
Tip: Stretch the dough gently to reach the corners. Firmly pinch the seams together to create a solid sheet of dough. This prevents the filling from leaking underneath!
-
-
Make the Filling: In a medium bowl, combine the softened cream cheese, sugar, 1 teaspoon vanilla, and the 1 whole egg.
-
Use a hand mixer or stand mixer to beat until the mixture is completely smooth and creamy. No lumps allowed! 🚫
-
-
Assemble: Spread the cheesecake mixture evenly over the bottom layer of dough.
-
The Roof: Unroll the second can of crescent rolls. Place this sheet on top of the cream cheese mixture.
-
Tip: Gently stretch it to cover the cheese completely. Pinch the seams of this top layer together as well for a prettier finish.
-
-
The Wash: Brush the top of the dough lightly with the egg white. This is the secret to that golden, flaky crust. ✨
-
Bake: Place in the oven and bake for 35-45 minutes.
-
Check at 30 minutes: You are looking for the top to be puffy and golden brown. If the center still jiggles a lot, give it more time.
-
-
Cool: Remove from the oven. Let it cool in the pan for at least 20 minutes. This allows the filling to set so you can cut clean slices.
-
The Glaze: While the Danish cools, whisk together the powdered sugar, milk, and ½ teaspoon vanilla in a small bowl until smooth.
-
Texture check: If it’s too thick, add a drop more milk. If too thin, add more sugar.
-
-
Finish: Drizzle the glaze over the slightly warm Danish. Slice into squares and serve! 🍽️
Notes
Enjoy the praise you are about to receive—you earned it! 😋

Leave a Comment