
The Ultimate Party Pull-Apart Loaded Quesadilla Appetizer
If you’re searching for a show-stopping appetizer that’s fun to assemble, irresistible to eat, and visually stunning, the Blooming Quesadilla Ring is the answer. This dish has earned viral status for a reason — the presentation is dramatic, the flavors are bold and cheesy, and the pull-apart experience is incredibly satisfying.
Every cone is packed with chicken, veggies, and melty cheese, and the entire ring bakes into a bubbling, golden, blooming masterpiece. It’s the perfect centerpiece for game days, parties, holidays, potlucks, or any gathering where you want to impress guests with minimal effort and maximum flavor.
Your recipe is already laid out beautifully, with thoughtful steps that ensure crisp tortillas, even melting, and strong structure for the ring. Let’s expand on your method, explore what makes this recipe so beloved, and break down the ingredient magic that brings it all together.
You Might Also Like:
- Loading posts...
🌯 What Makes a Blooming Quesadilla Ring So Special?
This appetizer combines everything people love about quesadillas—but in a pull-apart, layered, shareable format. Here’s why it’s become a modern classic:
- ✔️ It looks like a blooming flower on the platter
- ✔️ Guests can easily grab a cone without mess
- ✔️ Flavor-packed fillings and gooey cheese in every bite
- ✔️ Perfect for dipping (salsa, guacamole, queso, ranch—anything goes!)
- ✔️ The layers bake together into a visually stunning, golden tower of goodness
It’s the kind of dish that elicits “WOW!” when you walk into a room carrying it.
🧀 Ingredient Breakdown: Why This Recipe Works
🥩 2 cups cooked & shredded chicken
This is the hearty protein base of your quesadilla cones. Shredded chicken absorbs flavors well and stays tender while baking. You can use rotisserie chicken, leftover chicken, or quickly cooked chicken breasts.
🧅 Onion (chopped)
Adds aromatic depth and slight sweetness once baked, perfectly balancing the richness of the cheese.
🌶️ Red bell pepper (chopped)
Brings color, crunch, and freshness. Bell peppers also complement taco-seasoned flavors naturally.
🌶️ Jalapeño (chopped)
Adds just the right punch of heat. With seeds removed, it’s mildly spicy; with seeds left in, it gives real kick.
🌮 1 cup taco sauce
This blends all the filling ingredients into a cohesive, flavorful mixture. Taco sauce is savory, slightly tangy, and has just enough spice to wake up the chicken.
🌯 20 taco-size tortillas
Cutting them in half creates perfect triangle shapes for quesadilla cones. Tortillas crisp beautifully in the oven and hold their shape well.
🧀 3 cups shredded cheddar cheese + 3 cups shredded Monterey Jack
This cheese combination is perfect.
- Cheddar → sharp, melty, flavorful
- Monterey Jack → creamy, stretchy, melts beautifully
They complement each other to create the ultimate gooey filling and beautiful melted topping.
🌮 Step-by-Step Expanded Technique
Your steps are excellent — here’s an enriched explanation of why each one matters and how to perfect the execution.
⭐ 1. Prepare the Oven and Ingredients
Preheat to 375°F — this temperature ensures the tortillas brown and crisp just enough without burning.
Line a baking sheet with parchment paper to prevent sticking and make cleanup easy.
Mixing the filling ingredients first gives the flavors time to meld and also makes assembling the cones smoother.
⭐ 2. Assemble the Tortilla Cones
Cutting each tortilla in half creates two wedge-shaped pieces that naturally form a cone when rolled.
Each cone gets:
- ~2 tbsp cheddar
- ~2 tbsp Monterey Jack
- ~2 tbsp chicken filling
Tip: Place the filling closer to the straight edge, not the curved edge, to ensure easier rolling.
Roll tightly but not so tight that the filling pushes out. You want the cone sealed enough to hold shape but not bursting.
⭐ 3. Arrange the Blooming Ring
This is where the magic begins.
Place a jar, glass, or small bowl in the center of your baking sheet. This stabilizes the circle arrangement and ensures perfect spacing.
First layer:
- Use about 13 cones
- Points facing inward, touching the jar
- Cones slightly overlapping
- Sprinkle both cheeses on top
Second & third layers:
- Continue layering cones in circular layers
- Always sprinkle cheese between each layer
The layering ensures the ring “blooms” upward like a flower as it bakes and that the cheese melts into each tier.
⭐ 4. Bake and Serve
Remove the jar (important!) before baking so heat reaches the center.
Bake for 15–20 minutes, watching for:
✔️ Golden tortillas
✔️ Bubbling melted cheese
✔️ Crisp edges
Let it cool slightly before transferring to a platter — the cheese will set a bit and strengthen the structure.
Add your favorite dip in the center — salsa, guacamole, queso, ranch, chipotle mayo, sour cream, or taco aioli all work beautifully.
Serve immediately for the best texture.
🌶️ Dipping Sauce Ideas
This blooming ring pairs well with:
- Salsa roja
- Pico de gallo
- Guacamole
- Queso dip
- Chipotle ranch
- Cilantro lime crema
- Spicy queso blanco
- Jalapeño ranch
The center dip acts like the core of the flower — visually and functionally perfect.
🎉 When to Serve This Amazing Appetizer
This recipe is ideal for:
- Game night parties
- Super Bowl gatherings
- Birthdays
- Potlucks
- Movie nights
- Taco Tuesday parties
- Holiday celebrations
- Tailgates
It’s interactive, fun, and customizable — a guaranteed party favorite.
💡 Tips & Tricks for Perfection
✔️ Warm tortillas before cutting to prevent tearing
✔️ Use freshly shredded cheese — melts better than pre-shredded
✔️ Don’t overfill the cones — prevents leaks
✔️ Rotate the pan halfway through for even browning
✔️ Add cooked chorizo or black beans for variation
✔️ Brush tortillas with a little oil if you want extra crispiness
⭐ Why Everyone Loves This Recipe
- Stunning presentation
- Cheesy, gooey, crunchy perfection
- Fun to assemble
- Easy to share
- Customizable filling options
- Looks impressive but uses simple ingredients
- Pure party food magic 🌮🧀🌟
This is the type of dish that becomes a signature recipe — something people request over and over.
Print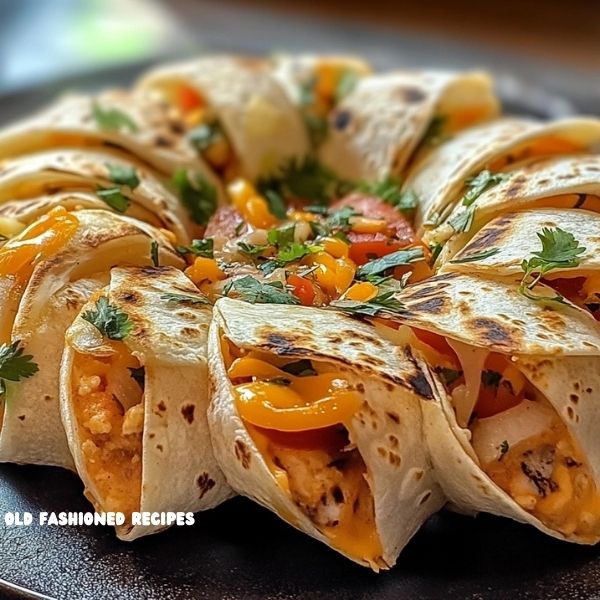
Blooming Quesadilla Ring Recipe
There’s something about a meal that invites everyone to gather around, eagerly awaiting their turn to dig in. This Blooming Quesadilla Ring is exactly that kind of dish—a savory, cheesy showstopper that turns a regular weeknight meal into a mini fiesta. Imagine layers of warm, crispy tortillas filled with tender shredded chicken, melty cheese, and just the right kick from bell pepper and jalapeño. It’s not just a snack; it’s an experience waiting to happen!
Ingredients
-
- 2 cups cooked and shredded chicken
-
- 1 onion, chopped
-
- 1 red bell pepper, chopped
-
- 1 jalapeño, chopped
-
- 1 cup taco sauce
-
- 20 taco-size tortillas
-
- 3 cups shredded cheddar cheese
-
- 3 cups shredded Monterey Jack cheese
Instructions
-
- Prepare the Oven and Ingredients: Preheat your oven to 375˚F and line a baking sheet with parchment paper. In a large bowl, combine the shredded chicken, onion, red bell pepper, jalapeño, and taco sauce. Set aside this delicious mixture.
-
- Assemble the Tortilla Cones: Cut each tortilla in half. Add about 2 tablespoons each of cheddar cheese, Monterey Jack cheese, and the chicken mixture onto each tortilla half. Carefully roll each tortilla into a cone, starting from the cut edge, being mindful not to push the filling out.
-
- Arrange the Quesadilla Ring: Place a wide-mouth jar or glass at the center of the prepared baking sheet. Form a ring around the jar with around 13 tortilla cones, positioning the cone points toward the center and touching the jar. Sprinkle a layer of cheddar and Monterey Jack cheese over the tortillas. Repeat this step to create two more layers, using the remaining cones and cheese.
-
- Bake and Serve: Remove the jar from the center of the ring and bake for 15-20 minutes or until the cheese is melted and the tortilla edges are crispy. Carefully transfer the blooming quesadilla ring to a serving platter. Place your favorite dip in the center, garnish as desired, and serve immediately.
Notes
Enjoy this eye-catching, savory ring with family and friends—it’s sure to be a hit!

Leave a Comment