Starting seeds indoors is exciting right up until every windowsill, shelf, and spare table is covered with trays.
Tomatoes need one flat.
Flowers need another.
You Might Also Like:
- Loading posts...
Peppers seem to take forever.
Then you discover one more packet of seeds you absolutely meant to plant—and there is nowhere left to put it.
That space problem is exactly why the seed snail method has become so popular.
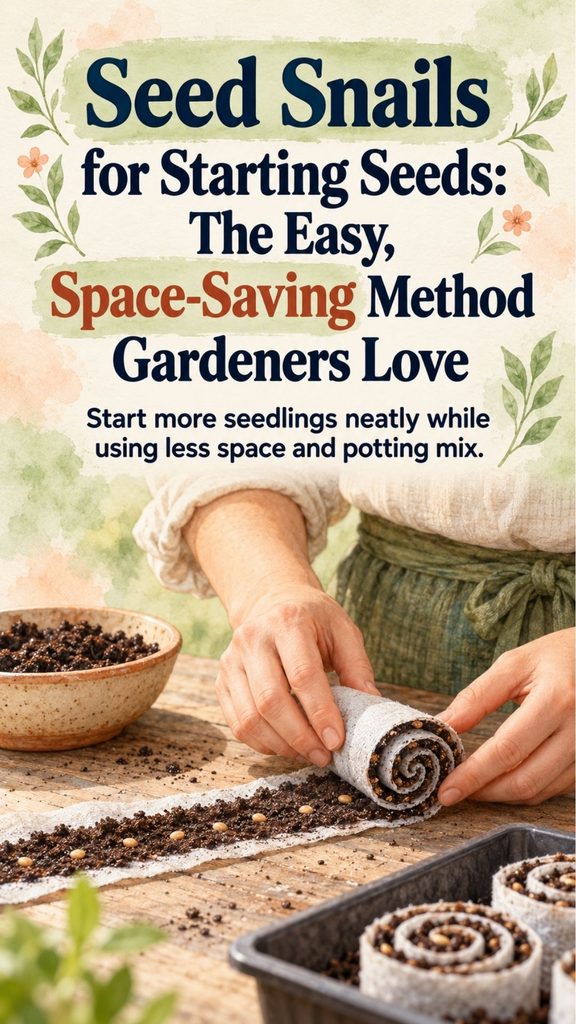
A seed snail is a long strip of flexible material covered with a thin layer of seed-starting mix, rolled into a spiral, and stood upright in a shallow container. Seeds are planted into the exposed soil at the top of the roll, allowing many seedlings to grow from a surprisingly small footprint. The spiral shape gives the method its snail-like name.
It is inexpensive, adaptable, and especially interesting for gardeners who want to start more plants indoors without adding another stack of plastic cell trays.
But seed snails are not magic, and they are not automatically better for every crop.
Used thoughtfully, they can be a clever addition to your seed-starting routine.
What Exactly Is a Seed Snail?
Think of a seed snail as a vertical seed tray that has been rolled into a coil.
Instead of filling dozens of individual cells with potting mix, you spread a thin layer of moist seed-starting mix over a long strip of flexible material.
Then you roll the strip into a spiral.
The finished roll is placed upright in a shallow tray or container so that the spiral of soil is visible from above.
Seeds are then tucked into the exposed growing medium.
As the seedlings develop, their roots grow downward through the narrow columns of mix created by the roll.
When the seedlings are ready to move on, the snail can be carefully unrolled and the young plants separated for transplanting.
The method has recently become especially popular online as a way to fit large numbers of seedlings into small indoor growing areas.
Why Gardeners Are Trying Seed Snails
The biggest advantage is obvious:
they save space.
A traditional seed tray spreads seedlings horizontally across a broad surface.
A seed snail organizes many seedlings around a compact spiral instead.
That can be especially useful if you:
- Start seeds in an apartment
- Have limited shelving
- Use only one or two grow lights
- Grow on a small table
- Want to start many flower varieties
- Have run out of traditional seed trays
- Want to experiment with another seed-starting method
They can also reduce the number of tiny plastic pots required during the earliest stage of growth.
Seed Snails Can Use Less Potting Mix
Individual pots need enough soil to fill every container.
A snail uses a relatively thin continuous layer.
That can reduce the volume of seed-starting mix required to germinate a large number of plants.
This does not mean you will never need pots.
Many seedlings eventually need more growing space before they are planted outdoors.
But seed snails can delay or reduce the number of containers needed during germination.
What You Need to Make a Seed Snail
You do not need specialized gardening equipment.
A basic setup requires:
- Flexible strip material
- Fresh seed-starting mix
- Seeds
- Scissors
- Water
- A shallow tray or container
- Rubber bands, twine, tape, or another way to secure the roll
- Plant labels
- A pencil, dibber, or small stick for placing seeds
A spoon or scoop is also helpful for spreading potting mix.
What Material Should You Use for the Roll?
This is one of the more interesting parts of the method because gardeners use many different materials.
Examples include:
- Flexible foam packaging
- Bubble wrap
- Thin reusable plastic sheeting
- Padded mailing envelopes
- Cardboard
- Newspaper
- Other flexible packaging materials
The material needs to bend easily enough to roll without collapsing.
Reusable Plastic or Foam
Flexible synthetic material tends to hold its shape well and does not break down while the seedlings are growing.
It can also be cleaned and reused.
If you already have suitable packaging material, reusing it can make more sense than buying something new solely to make seed snails.
Cardboard and Paper
Cardboard and newspaper are attractive because they are inexpensive and biodegradable.
However, they can soften and weaken after remaining damp for a long period.
That is one reason seed snails made from degradable materials may work best with relatively fast-growing seedlings that will be transplanted before the roll begins falling apart.
Use Seed-Starting Mix, Not Heavy Garden Soil
Seeds need a growing medium that holds moisture while still allowing air around developing roots.
For indoor seed starting, a clean, lightweight seed-starting mix is preferable to garden soil.
University of Minnesota Extension recommends a commercial soilless seed-starting mixture because it is lightweight, porous, and less likely to introduce weeds or disease organisms into the warm, moist conditions used for germination.
Heavy garden soil can compact badly inside a snail.
That makes the roll harder to form and can leave young roots with less oxygen.
How to Make a Seed Snail Step by Step
The exact dimensions are flexible, but a manageable beginner roll might be around 4 to 6 inches tall and roughly 20 to 24 inches long. Similar dimensions are commonly used in current seed-snail instructions.
You can make longer or shorter rolls once you understand how the method behaves.
Step 1: Moisten the Seed-Starting Mix
Add a little water to your seed-starting mix before assembling the snail.
You want it moist enough to hold together when rolled.
It should not be dripping.
Think of a wrung-out sponge.
Starting with lightly moistened mix is much easier than trying to thoroughly wet a dry spiral after it has been rolled.
Step 2: Lay Out the Strip
Place your flexible strip flat on a table or other washable work surface.
If you are concerned about mess, work over a tray.
Keep the long edge facing you.
Step 3: Spread a Thin Layer of Mix
Spread approximately half an inch of moist seed-starting mix over the strip.
Do not pile it excessively thick.
You need enough growing medium for germination and early root development, but too much soil makes the roll bulky and difficult to coil.
Leave a small section at the final end relatively clear so the roll can be secured more easily.
Step 4: Begin Rolling
Start at one end and gently roll the strip inward.
Keep the roll reasonably snug so the soil stays in place.
Do not compress it as tightly as possible.
Roots still need air and space.
The finished roll should resemble a large cinnamon roll when viewed from above.
Step 5: Secure the Snail
Wrap a rubber band, piece of twine, or appropriate tape around the outside.
The purpose is simply to prevent the roll from springing open.
Do not tighten the fastener enough to crush the growing medium.
Step 6: Stand It Upright
Place the finished snail vertically in a shallow waterproof tray.
The spiral of soil should face upward.
A container with short sides can help support several snails together.
Step 7: Add the Seeds
Make small holes or depressions in the visible soil spiral.
Space seeds according to how long you expect them to remain in the snail.
Around an inch apart may work for many plants that will be transplanted relatively young, but larger seedlings will need more room.
Plant seeds at the depth recommended on the seed packet.
Seed depth varies considerably by species, so do not assume every seed should be buried equally deeply.
Step 8: Label Immediately
Seedlings look remarkably similar when they first emerge.
Add the plant name and, ideally, the sowing date.
Do this before you convince yourself that you will remember.
You probably will not.
How to Water a Seed Snail
One advantage of standing a snail in a shallow tray is that you can water from below.
Add a small amount of water to the tray and allow the growing medium to absorb it upward.
Then remove or drain excess standing water.
Bottom watering can reduce disturbance to freshly planted seeds.
You can also water gently from above when necessary, but avoid pouring hard enough to wash seeds from their positions.
The goal is moist, not waterlogged.
University of Minnesota Extension recommends keeping seed-starting mix moist while germination is occurring while avoiding saturated growing media and standing water.
Should You Cover the Seed Snail?
A clear humidity cover can help prevent the surface from drying before seeds germinate.
You might use:
- A clear propagation lid
- Loose clear plastic covering
- A transparent container
Do not create a permanently sealed, soaking-wet environment.
Once seedlings emerge, ventilation becomes increasingly important.
Remove or open the cover rather than keeping tender stems trapped in constantly humid conditions.
Be Careful With Damping-Off
Seed snails stay moist quite efficiently.
That is useful for germination, but it can become a problem if the growing mix remains excessively wet.
Damping-off is a group of diseases that can rot germinating seeds or cause young seedlings to collapse around the soil line.
Excess moisture, high humidity, poor drainage, and overcrowding all increase the risk.
Reduce the risk by:
- Using fresh seed-starting mix
- Starting with clean equipment
- Avoiding soggy soil
- Giving seedlings airflow
- Providing adequate light
- Not crowding seeds unnecessarily
Do not continually add water simply because the top surface looks slightly dry.
Check the moisture deeper in the roll too.
Seedlings Still Need Strong Light
Saving floor space does not eliminate the need for proper light.
In fact, fitting more seedlings into a smaller area means you need to be particularly careful that all of them receive enough illumination.
Weak light leads to tall, thin seedlings stretching toward the light source.
University of Minnesota Extension recommends artificial lighting for reliable indoor seed starting and generally suggests about 12 to 16 hours of light each day, with lights kept close to the tops of young seedlings.
A very bright window may work for a small number of plants, but tomatoes, peppers, and other seedlings kept indoors for several weeks can become leggy without supplemental light.
Which Seeds Work Well in Seed Snails?
Seed snails are particularly attractive for plants that tolerate transplanting reasonably well.
Possible candidates include:
- Tomatoes
- Peppers
- Eggplants
- Lettuce
- Kale
- Cabbage
- Broccoli
- Many annual flowers
- Some herbs
The method is especially useful when you want to germinate many plants and separate them while they are still young.
What About Onions and Leeks?
Onions and leeks are interesting possibilities because they are commonly started together in larger containers rather than always requiring individual cells.
University of Minnesota Extension specifically notes onions and leeks as exceptions to the general preference for starting seedlings individually.
That makes them reasonable candidates for experimenting with compact seed-starting systems.
Crops That May Be Better in Individual Pots
Some plants dislike having their roots disturbed.
Examples commonly include:
- Cucumbers
- Squash
- Melons
For these crops, individual biodegradable or easily transplanted containers may be safer than growing many plants tightly together in a roll.
University of Minnesota Extension specifically recommends fiber or paper pots for seedlings such as cucumber and squash that do not transplant particularly well.
You can certainly experiment, but the seed snail should not automatically replace every other propagation method.
How Long Can Seedlings Stay in a Snail?
That depends on:
- Species
- Spacing
- Roll depth
- Available light
- Temperature
- Growth rate
Seed snails are best thought of as a starting system, not necessarily a permanent container.
When seedlings begin becoming crowded or need more root volume, they should be separated and either:
- Potted into larger containers
- Transplanted outdoors after appropriate hardening off
Do not keep plants trapped in the snail simply because they still technically fit.
How to Transplant Seedlings From a Seed Snail
This is the satisfying part.
Place the snail on a clean work surface.
Remove the rubber band or other fastener.
Gently begin unrolling it.
Work slowly.
The roots should become visible as the strip opens.
Separate each seedling with as much growing mix around the roots as practical.
Avoid pulling plants by their stems.
University of Minnesota Extension recommends supporting seedlings by their root ball during transplanting and handling them by a leaf rather than the stem when support from above is necessary. Damaging a leaf is generally less serious than crushing the growing stem.
Potting the Seedlings On
If outdoor planting conditions are still weeks away, transfer seedlings into individual pots.
Make a hole large enough for the root system.
Lower the seedling gently into place.
Fill around the roots with fresh potting mix and water carefully.
Most seedlings should be replanted at approximately their previous growing depth.
Tomatoes are an exception because they can often be planted more deeply and produce additional roots along buried portions of their stems.
Harden Seedlings Before Moving Them Outdoors
Indoor seedlings are not immediately prepared for outdoor conditions.
Bright sun, wind, and changing temperatures can stress tender plants.
Gradually acclimate them before final planting.
A common approach is to begin with a few hours outside in a protected location, then gradually increase exposure over roughly a week or more.
University of Minnesota Extension recommends a gradual hardening period of about 7 to 10 days for indoor-grown seedlings.
Do Seed Snails Really Prevent Tangled Roots?
This claim deserves some caution.
Supporters of the seed snail method often report that seedlings separate easily because roots tend to grow down through the vertical soil layers.
However, individual cells remain the conventional recommendation when the goal is to minimize root entanglement.
University of Minnesota Extension recommends individual cells for many seedlings precisely because roots growing together in larger shared containers can become damaged when separated.
So it is better to say that seed snails can make separation convenient when managed well, not that they guarantee perfectly untangled roots.
Spacing seeds properly and transplanting before plants become overcrowded make a big difference.
Are Seed Snails Better Than Seed Trays?
Not necessarily.
They solve a different problem.
Seed Snails Are Useful When:
- Space is extremely limited
- You want to germinate many seedlings
- You enjoy DIY garden methods
- You have reusable packaging available
- You plan to transplant relatively young seedlings
Traditional Cell Trays Are Better When:
- You want one clearly separated root system per plant
- Seedlings will remain indoors for a long time
- You use automated watering systems
- You need standardized containers
- You grow plants sensitive to root disturbance
There is no reason you cannot use both.
A snail may be perfect for fifty flower seedlings while your cucumbers grow happily in individual pots beside them.
Common Seed Snail Mistakes
The method is simple, but several problems can make it frustrating.
Using Too Much Soil
A very thick layer becomes heavy and difficult to roll.
Start thin.
Rolling Too Tightly
Over-compression reduces air spaces and makes the snail harder to manage.
Secure it rather than crushing it.
Letting the Roll Dry Completely
Because the soil layer is thin, neglected snails can dry faster than large pots.
Check them regularly.
Keeping It Constantly Soggy
The opposite problem is equally common.
Excessive moisture encourages disease.
Planting Too Many Seeds
The entire attraction of the method is fitting more seedlings into less space, but there is still a limit.
Crowded stems and roots eventually become difficult to separate.
Providing Weak Light
A compact roll filled with twenty leggy seedlings is not a success.
Strong light remains essential.
Forgetting Labels
One spiral of peppers can look remarkably similar to another spiral of tomatoes during the earliest stages.
Label as soon as you sow.
Can You Reuse a Seed Snail?
If you used durable plastic or foam material, usually yes.
After transplanting:
- Remove old roots and potting mix.
- Wash the strip.
- Clean it appropriately before another seed-starting cycle.
- Allow it to dry.
- Store it flat or rolled.
Do not repeatedly reuse contaminated growing mix.
Fresh seed-starting medium helps reduce the risk of carrying seedling diseases from one crop to another.
What About Biodegradable Seed Snails?
A biodegradable roll sounds appealing, but there is a tradeoff.
The material needs to remain strong while constantly moist.
If paper or cardboard breaks down before the seedlings are ready, the snail can collapse.
For short-duration crops, biodegradable materials may work beautifully.
For peppers or other seedlings that germinate slowly and remain indoors longer, durable material may be easier to manage.
Choose the material according to how long the seedling stage is likely to last.
Seed Snails Do Not Eliminate the Need for Good Seed-Starting Practices
It is easy to get excited about a clever container and forget that the container is only one piece of the process.
Healthy seedlings still require:
- Appropriate germination temperature
- Quality seed-starting mix
- Correct planting depth
- Consistent moisture
- Good drainage
- Strong light
- Air movement
- Enough growing space
- Gradual acclimation before outdoor planting
A spiral cannot compensate for cold soil, soggy roots, or insufficient light.
Try One Snail Before Converting Your Entire Seed Setup
If you already have a seed-starting system that works well, there is no reason to throw it away.
Make one snail.
Plant a crop you already know how to grow.
Place a few of the same seeds in a traditional tray if you want a useful comparison.
Observe:
- Germination
- Moisture
- Seedling strength
- Root development
- Ease of transplanting
- Space used
Then decide whether the method actually improves your own gardening setup.
One 2026 gardener who tested the viral method with pepper seeds reported frustrations and mixed results, a useful reminder that social-media popularity does not guarantee success in every home setup.
A Clever Solution for Crowded Seed-Starting Season
Seed snails are not a revolutionary replacement for every pot and tray.
But they are clever.
A long strip, a little seed-starting mix, and a handful of seeds can be turned into a remarkably compact growing system.
For gardeners with limited indoor space, that may be exactly what is needed when spring seed-starting season begins taking over the house.
Keep the mix moist but not soaked.
Provide strong light.
Do not overcrowd the roll.
Transplant before roots and foliage become excessively congested.
And choose crops that tolerate the method well.
If you normally stop sowing because there is no room left under the grow lights, a seed snail may give you enough space for one more variety.
Or several.
And for a gardener staring at a pile of unopened seed packets in late winter, that may be the most convincing advantage of all.