
The Ultimate No-Bake Dessert That Combines Two Classics in One Decadent Slice
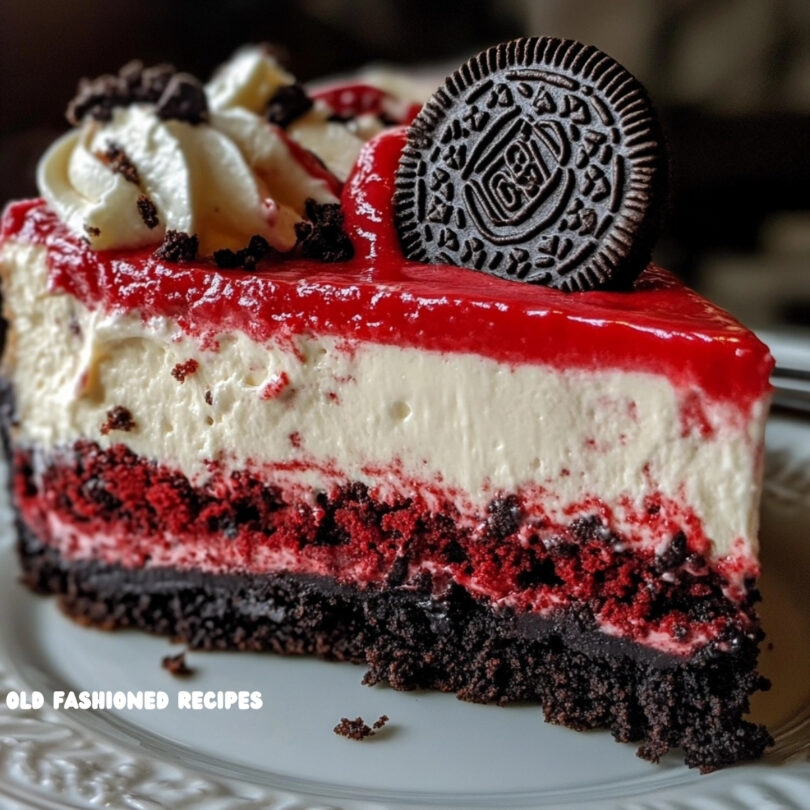
Welcome to dessert heaven — where rich red velvet meets creamy cheesecake and indulgent Oreo crusts in one stunning, no-bake creation. This Red Velvet Oreo Cheesecake isn’t just eye-catching — it’s melt-in-your-mouth delicious. Featuring a crunchy Oreo base, a smooth cream cheese center, a luscious layer of red velvet mousse or topping, and decadent garnishes like whipped cream, cherries, and mini Oreos, this cake is a showstopper for any celebration.
Best of all? It’s a tried-and-true recipe that’s been tested by home bakers and dessert lovers alike. Whether you’re baking for a holiday, birthday, potluck, or just treating yourself, this no-fuss cheesecake will steal the spotlight.
You Might Also Like:
- Loading posts...
Why You’ll Love This Cheesecake
- 🍫 Crushed Oreo crust: Deep chocolate flavor with that perfect crunch.
- 🍰 No-bake cream cheese filling: Light, smooth, and tangy.
- ❤️ Velvety red topping: A layer of elegance that tastes as good as it looks.
- 🎉 Impressive presentation: Great for parties, holidays, or just Instagram!
- ⏱️ Make-ahead friendly: Tastes even better the next day.
Ingredients (Tested and Real!)
For the Oreo Crust:
- 24 Oreo cookies (classic or chocolate creme)
- 1/4 cup melted unsalted butter
For the Cheesecake Filling:
- 16 oz (2 packages) cream cheese, softened
- 1 cup powdered sugar
- 1 tsp vanilla extract
- 1 cup heavy whipping cream (cold)
For the Red Velvet Topping:
- 1 box red velvet cake mix (use just enough to create a mousse-like topping or bake and crumble if using baked layer)
- 1/2 cup milk or whipping cream
- Optional: 8 oz whipped topping (Cool Whip or homemade stabilized whipped cream)
Garnishes:
- Whipped cream (homemade or canned)
- Maraschino cherries or glazed cherry topping
- Mini Oreos or Oreo crumbles
Instructions
Step 1: Make the Oreo Crust
- Pulse the Oreos in a food processor until they become fine crumbs.
- Mix with melted butter until evenly coated.
- Press the mixture into the bottom of a 9-inch springform pan.
- Chill in the fridge for 20 minutes while you prepare the filling.
Tip: Line the pan with parchment for easy release.
Step 2: Prepare the Cheesecake Filling
- In a large bowl, beat softened cream cheese and powdered sugar until smooth.
- Add vanilla extract and mix well.
- In a separate bowl, beat heavy whipping cream until stiff peaks form.
- Fold whipped cream gently into the cream cheese mixture until combined.
Spread the cheesecake filling over the chilled Oreo crust. Smooth the top with a spatula.
Chill again for at least 1 hour.
Step 3: Make the Red Velvet Layer
Option 1 – Mousse-style topping:
- In a bowl, combine 1 cup of red velvet cake mix with 1/2 cup milk and 1/2 tub whipped topping.
- Beat until fluffy.
- Spread gently over the cheesecake filling.
Option 2 – Crumbled topping:
- Bake the red velvet cake mix as directed (use half the batter).
- Cool completely and crumble over the cheesecake layer.
Step 4: Decorate & Serve
Top with:
- Swirls of whipped cream
- Cherries (fresh, maraschino, or pie filling)
- Whole or crushed mini Oreos
Chill the entire cheesecake for 4–6 hours, or overnight, for best texture and flavor.
Slice with a warm knife for clean cuts and serve chilled.
Tips for Success
- ❄️ Chill thoroughly: No-bake cheesecakes need time to set. Overnight is best.
- 🎂 Use a springform pan for easy removal.
- 🍒 Add cherry pie filling if you want a fruitier bite.
- 🎨 Want a deeper red layer? Add a drop of red food gel to the mousse.
Storage
- Refrigerator: Store in an airtight container for up to 4 days.
- Freezer: Freeze wrapped slices for up to 1 month. Thaw in the fridge overnight.
Make It Your Own
- Chocolate base: Use chocolate graham crackers instead of Oreos.
- Cream cheese upgrade: Add mascarpone or white chocolate to the filling.
- Layered style: Alternate red velvet and cream cheese for a stripe effect.
- Holiday flair: Add crushed peppermint or candy hearts for Christmas/Valentine’s Day.
Final Thoughts
This Red Velvet Oreo Cheesecake brings all the elegance of a bakery dessert into your kitchen — no baking required. With layers of chocolate crunch, creamy filling, and eye-catching red velvet richness, it’s not only beautiful, but irresistibly delicious. Perfect for birthdays, holidays, or “just because,” it’s a guaranteed showstopper.
Print
Red Velvet Oreo Cheesecake 🍰❤️
Red Velvet Oreo Cheesecake
Ingredients
Oreo Crust:
- 24 Oreo cookies
- 1/4 cup melted butter
Filling:
- 16 oz cream cheese, softened
- 1 cup powdered sugar
- 1 tsp vanilla extract
- 1 cup heavy whipping cream
Red Velvet Topping:
- 1 cup red velvet cake mix
- 1/2 cup milk or whipping cream
- Optional: 8 oz whipped topping (for mousse style)
Garnishes:
- Whipped cream
- Cherries or cherry pie filling
- Mini Oreos or crushed Oreos
Instructions
- Crush Oreos and mix with melted butter. Press into springform pan. Chill 20 min.
- Beat cream cheese and powdered sugar until smooth. Add vanilla.
- Beat heavy cream until stiff peaks form; fold into cheese mixture.
- Spread filling over crust. Chill 1 hour.
- Mix red velvet cake mix with milk and whipped topping for mousse topping OR bake and crumble cake for topping.
- Spread red velvet layer over cheesecake. Top with whipped cream, cherries, and Oreos.
- Chill at least 4–6 hours or overnight before slicing.
Notes:
- Use a hot knife for clean slices.
- Store in fridge up to 4 days or freeze slices individually.
- Try layering red velvet and cheesecake for a marble effect.
Creamy, dreamy, and dangerously delicious!
Notes
Prep Time: 30 minutes | Chill Time: 6 hours | Total Time: 6 hours 30 minutes
Servings: 10–12


Leave a Comment