
Hawaiian Butter Mochi: A Sweet, Chewy, Buttery Delight
If you’ve ever visited Hawaii or have a love for tropical flavors, you might have come across Hawaiian Butter Mochi—a rich, buttery, and chewy treat that’s somewhere between cake and mochi. Unlike traditional Japanese mochi, which is made purely from glutinous rice flour and water, Hawaiian Butter Mochi adds butter, eggs, coconut milk, and sugar to create a uniquely soft, chewy, and slightly crispy-edged dessert that’s pure heaven in every bite.
This beloved Hawaiian dessert is easy to make, requires just one bowl, and is perfect for sharing at potlucks, family gatherings, or whenever you’re craving something sweet and tropical. Let’s dive into this delicious and simple recipe! 🌺🍍
Why You’ll Love This Hawaiian Butter Mochi
✅ Soft, chewy, and buttery – A perfect balance of textures!
✅ One-bowl recipe – Super easy to mix and bake.
✅ Gluten-free – Made with sweet rice flour (glutinous rice flour).
✅ Great for sharing – A hit at potlucks and family gatherings.
✅ Delicious tropical flavor – Coconut milk and butter make it irresistible.
You Might Also Like:
- Loading posts...
Ingredients You’ll Need
🥥 For the Mochi:
- 1 box (16 oz) Mochiko (sweet rice flour/glutinous rice flour)
- 2 cups granulated sugar
- 2 teaspoons baking powder
- ¼ teaspoon salt
- 4 large eggs
- 1 teaspoon vanilla extract
- 1 can (13.5 oz) full-fat coconut milk
- 1 can (12 oz) evaporated milk
- ½ cup unsalted butter, melted
🌺 Optional Add-Ins:
- ½ cup shredded coconut (for extra coconut flavor)
- ½ teaspoon coconut extract (for an extra tropical touch)
- ¼ teaspoon cinnamon (for a subtle warmth)
How to Make Hawaiian Butter Mochi
Step 1: Preheat & Prepare
- Preheat your oven to 350°F (175°C).
- Grease a 9×13-inch baking pan with butter or nonstick spray.
Step 2: Mix the Batter
- In a large mixing bowl, whisk together the Mochiko flour, sugar, baking powder, and salt.
- Add the eggs, vanilla extract, coconut milk, evaporated milk, and melted butter.
- Stir until smooth and fully combined—no lumps!
💡 Pro Tip: The batter will be thin and liquidy—don’t worry, that’s normal!
Step 3: Bake the Mochi
- Pour the batter into the greased baking pan and smooth the top.
- Bake for 50-60 minutes, or until the top is golden brown and the center is set.
- Let the mochi cool completely before slicing.
Step 4: Slice and Serve
- Use a plastic knife or greased metal knife to slice into squares (this prevents sticking).
- Enjoy warm, at room temperature, or chilled!
How to Store & Freeze Butter Mochi
🧊 To Store:
- Keep at room temperature in an airtight container for up to 3 days.
- Refrigerate for up to 1 week—just warm slightly before eating.
❄️ To Freeze:
- Wrap individual pieces in plastic wrap and store in a freezer bag.
- Thaw at room temperature or microwave for 20-30 seconds to enjoy again!
Variations & Fun Twists
🍍 Pineapple Butter Mochi – Add ½ cup crushed pineapple for a fruity twist.
🍫 Chocolate Butter Mochi – Mix in ¼ cup cocoa powder for a chocolatey version.
🥜 Peanut Butter Mochi – Swirl in 2 tablespoons peanut butter for a nutty flavor.
🧀 Cheesy Butter Mochi – Sprinkle ½ cup shredded cheddar cheese on top for a sweet-savory combo (yes, it’s a thing in Hawaii!).
What to Serve with Butter Mochi
☕ With Coffee or Tea – A perfect afternoon treat.
🍍 With Fresh Fruit – Pineapple, mango, or berries for a tropical vibe.
🥥 With Coconut Ice Cream – For an extra indulgent dessert!
🍫 With Chocolate Drizzle – Melted chocolate makes everything better.
Final Thoughts: Why You’ll Love This Butter Mochi Recipe
Hawaiian Butter Mochi is rich, chewy, and packed with delicious coconut flavor. It’s an easy-to-make, gluten-free dessert that’s perfect for sharing with friends and family. Whether you’re making it for a party, a sweet snack, or just because—you’ll love every bite of this Hawaiian classic. 🌺
So, what are you waiting for? Bake a batch today and enjoy this chewy, buttery treat! 🍰
Will you be trying this recipe? Let me know how it turns out! 😊
Print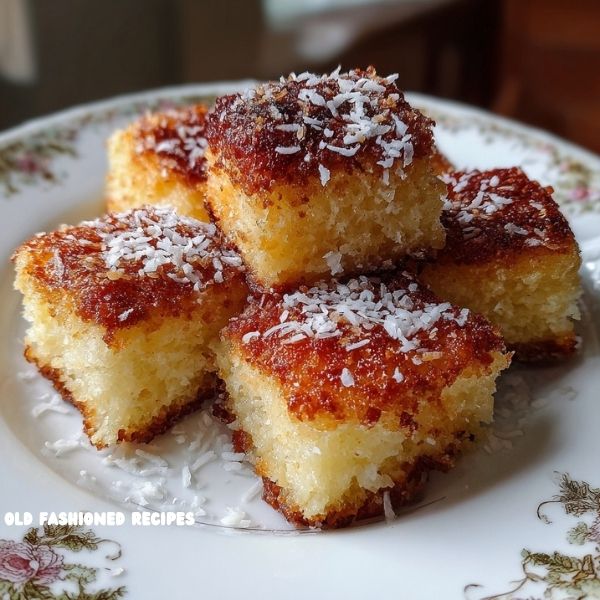
Hawaiian Butter Mochi Recipe
If you’ve ever visited Hawaii or have a love for tropical flavors, you might have come across Hawaiian Butter Mochi—a rich, buttery, and chewy treat that’s somewhere between cake and mochi. Unlike traditional Japanese mochi, which is made purely from glutinous rice flour and water, Hawaiian Butter Mochi adds butter, eggs, coconut milk, and sugar to create a uniquely soft, chewy, and slightly crispy-edged dessert that’s pure heaven in every bite.
Ingredients
🥥 For the Mochi:
- 1 box (16 oz) Mochiko (sweet rice flour/glutinous rice flour)
- 2 cups granulated sugar
- 2 teaspoons baking powder
- ¼ teaspoon salt
- 4 large eggs
- 1 teaspoon vanilla extract
- 1 can (13.5 oz) full-fat coconut milk
- 1 can (12 oz) evaporated milk
- ½ cup unsalted butter, melted
🌺 Optional Add-Ins:
- ½ cup shredded coconut (for extra coconut flavor)
- ½ teaspoon coconut extract (for an extra tropical touch)
- ¼ teaspoon cinnamon (for a subtle warmth)
Instructions
Step 1: Preheat & Prepare
- Preheat your oven to 350°F (175°C).
- Grease a 9×13-inch baking pan with butter or nonstick spray.
Step 2: Mix the Batter
- In a large mixing bowl, whisk together the Mochiko flour, sugar, baking powder, and salt.
- Add the eggs, vanilla extract, coconut milk, evaporated milk, and melted butter.
- Stir until smooth and fully combined—no lumps!
💡 Pro Tip: The batter will be thin and liquidy—don’t worry, that’s normal!
Step 3: Bake the Mochi
- Pour the batter into the greased baking pan and smooth the top.
- Bake for 50-60 minutes, or until the top is golden brown and the center is set.
- Let the mochi cool completely before slicing.
Step 4: Slice and Serve
- Use a plastic knife or greased metal knife to slice into squares (this prevents sticking).
- Enjoy warm, at room temperature, or chilled!
Notes
What to Serve with Butter Mochi
☕ With Coffee or Tea – A perfect afternoon treat.
🍍 With Fresh Fruit – Pineapple, mango, or berries for a tropical vibe.
🥥 With Coconut Ice Cream – For an extra indulgent dessert!
🍫 With Chocolate Drizzle – Melted chocolate makes everything better.


Leave a Comment