
When spring is in the air and Easter is just around the corner, there’s nothing quite like a sweet, chocolatey treat that brings smiles to faces young and old. That’s exactly what Chocolate Easter Nests are all about—easy, fun, festive, and oh-so-delicious! 💝
With just a few ingredients and no oven required, these cute little nests are ideal for making with kids, prepping for parties, or simply indulging in some seasonal joy. Whether you’re putting together an Easter dessert table or prepping goody bags for the neighborhood, Chocolate Easter Nests are the ultimate Easter crowd-pleaser.
A Treat With Timeless Charm 🌸
These adorable no-bake nests have been a beloved Easter tradition in homes for decades. Their resemblance to little bird nests (filled with candy-coated eggs) taps into the theme of renewal, spring, and new life—which makes them not only tasty but meaningful too. 🐥
You Might Also Like:
- Loading posts...
The traditional recipe combines chocolate, shredded cereal (or noodles), and mini candy eggs. It’s like edible Easter magic that takes under 30 minutes to make!
What Makes Chocolate Easter Nests So Popular? 🤎
Here’s why these treats have stood the test of time:
- No baking needed – perfect for kids and last-minute prep.
- Customizable – use your favorite chocolate, toppings, or cereal.
- Visually adorable – they steal the show on any dessert table!
- Super shareable – they travel well for school parties or potlucks.
- Nostalgic and comforting – they bring back childhood joy for many.
And the best part? You don’t need to be a baking expert to whip up a batch of these cuties.
Classic Chocolate Easter Nests Recipe 🧁🌈
Let’s jump into the real-deal, tried-and-true recipe that’s been loved for generations.
🛒 Ingredients:
- 🍫 2 cups semisweet or milk chocolate chips (or chopped chocolate bars)
- 🍜 3 cups chow mein noodles (or shredded wheat cereal, crushed)
- 🥄 1 tablespoon peanut butter (optional, for richness)
- 🥚 Mini candy-coated chocolate eggs (like Cadbury Mini Eggs or jelly beans)
- 🌈 Sprinkles (optional for extra fun)
- 🧁 Cupcake liners or muffin tins for shaping
Note: Chow mein noodles give a twig-like look, but you can substitute pretzel sticks, shredded coconut, or even Rice Krispies!
👩🍳 Instructions (Step-by-Step)
1. Melt the Chocolate
In a microwave-safe bowl or using a double boiler, gently melt the chocolate chips. Stir every 20 seconds if using the microwave until smooth. If desired, stir in a tablespoon of peanut butter for extra creaminess.
2. Stir in the Noodles
Once the chocolate is smooth, gently fold in the chow mein noodles or crushed cereal until fully coated. You want every strand to be chocolatey but not overly soaked.
3. Form the Nests
Scoop heaping spoonfuls of the chocolate mixture into cupcake liners or greased muffin tins. Use the back of a spoon or your fingers to form a nest shape, creating a little well in the center.
4. Decorate
While the chocolate is still soft, press 2–3 mini candy eggs into the center of each nest. Add sprinkles for extra color if desired.
5. Let Set
Allow the nests to cool at room temperature or chill in the refrigerator for 15–20 minutes until firm.
🧊 Storage & Make-Ahead Tips
- These nests can be stored in an airtight container at room temperature for up to 5 days.
- For warm climates, store in the fridge to prevent melting.
- Want to make them ahead? You can prep the nests (without eggs) and add the candy right before serving for the freshest look!
🍬 Fun Variations to Try
Want to get creative with your nests? Try these festive spins:
- 🥥 Coconut Nests: Mix in shredded coconut for a “hay-like” texture.
- 🥜 Nutty Nests: Add chopped almonds, walnuts, or hazelnuts.
- 🍫 White Chocolate Version: Swap semisweet for white chocolate and use pastel eggs.
- 🌱 Mint Chocolate Nests: Add a few drops of mint extract to the chocolate for a fresh twist.
- 🧁 Cupcake Base: Make chocolate cupcakes and top with a nest made from chocolate & pretzels.
👨👩👧👦 A Perfect Family Activity
One of the best things about Chocolate Easter Nests is how kid-friendly they are. From melting chocolate to shaping nests and decorating with candy, it’s a hands-on activity that kids of all ages will love.
Here are some tips for baking with kids:
- Use silicone muffin molds for easy cleanup.
- Let little ones choose their candy eggs.
- Set up a decorating station with mini bowls of sprinkles and pastel M&Ms.
- Play springtime music in the background for extra fun!
📊 Nutritional Info (Per Nest – Approx.)
- Calories: 160
- Fat: 7g
- Carbs: 23g
- Sugar: 15g
- Protein: 2g
Values will vary based on the chocolate and cereal used.
🎉 Serving Suggestions
Chocolate Easter Nests are perfect for:
- 🌼 Easter brunch dessert tables
- 🎁 Party favors or goody bags (wrap them in cellophane with a bow)
- 🐣 Spring bake sales
- 🏫 School treats or teacher gifts
- 💌 Homemade Easter baskets
What People Are Saying 🗣️
“I’ve made these every year with my nieces since they were toddlers. They’re now teens and still love them!” – Linda G.
“They were the first dessert to disappear from the Easter table. I should’ve made a double batch!” – Marcus T.
“So simple and so adorable. My preschooler helped make these and proudly shared them with the neighbors.” – Kelsey R.
💡 Final Thoughts
There’s a reason why Chocolate Easter Nests have remained a springtime staple for so long. They combine the best of the season—bright colors, chocolatey goodness, and joyful tradition. And with no baking required, they’re a foolproof favorite that even the busiest parent or kitchen newbie can pull off!
So this Easter, gather the family, turn up the spring playlist, and make some sweet edible nests that everyone will love. 🐰🌼💕
Print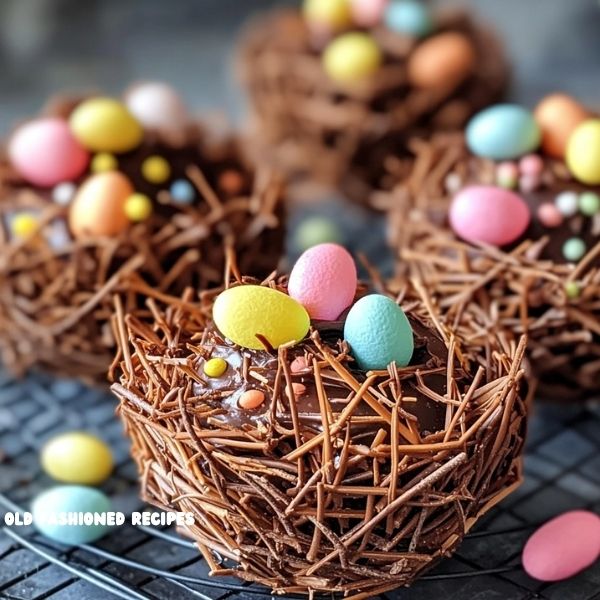
Chocolate Easter Nests: A No-Bake Treat Everyone Loves 🐰🌷🍫
Ingredients
-
🍫 2 cups chocolate chips
-
🍜 3 cups chow mein noodles (or substitute)
-
🥄 1 tbsp peanut butter (optional)
-
🥚 Mini candy eggs
-
🌈 Sprinkles (optional)
Instructions
-
Melt chocolate (and peanut butter, if using) until smooth.
-
Fold in noodles gently until coated.
-
Spoon mixture into muffin tins or cupcake liners.
-
Shape into nests and press candy eggs on top.
-
Add sprinkles and let set until firm.
-
Serve and enjoy! 🐣🍫
Notes
Prep Time: 15 minutes
Set Time: 15–20 minutes
Total Time: 30–35 minutes
Servings: 12 nests


Leave a Comment